
You’ve recorded some great sounding drums and are eager to get to mixing, but hold up a doc. Like vocals, those drums may need a little editing first. If you have not checked out part one of this series, for tips on recording smacking drum tracks, you can do so here.
To the purists and swollen heads, the “E” word sometimes activates the defenses and causes some to either feel insecure about their performance(s) or to say things like, “I don’t need to be edited” or “The nuances keep it authentic”. Both of those statements are sometimes true and good editing doesn’t mean sterile or robotic. As with vocals, there’s a fine like between fixing to tighten up and straight up correcting to a grid to make perfect. What I want to focus on here is two main areas that we should pay attention to for the best sounding drums.
1. Timing…
When most musicians hear the word timing they think about locking to the tempo, and while that is important, hopefully we addressed that by hiring the right drummer.
***CLICK HERE TO READ PART ONE***
There may be a couple of places we need to nudge to tighten up the timing, but it shouldn’t be much.
The timing we are talking about here is dealing with samples. During recording, we took the time to place the microphones carefully and checked for phase against one another, but even with that, the sound traveling through the air has the potential to arrive at the microphones at different times. You could take even more time in the recording process to minimize this by doing test recordings, zooming into to see if the waveforms are completely lined up, and then moving microphones to adjust. But that will take forever to get perfect.
There’s a better way!
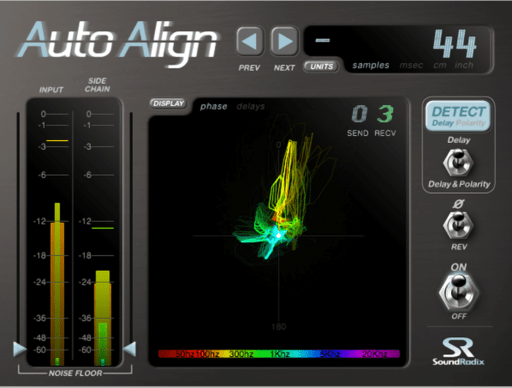
I’d like to introduce you to an amazing plugin from Sound Radix, Auto-Align. Similarly to Vocalign, Auto-Align takes sources and aligns them to another; by the sample. If that wasn’t cool enough, Auto-Align can also check for phase alignment at the same time! Now I will tell you that this plugin will take a little trial and error to figure out the best method of working with it for you. I personally have found the Greg Wurth method of aligning to the Overhead Left to yield the best results. Here’s a video of him walking you through how he uses it:
.
2. Bleed…
Being a drummer first, the sound of the drum kit is a harmonious result of all of the heads singing together as others are hit. This natural occurrence doesn’t yield itself well to the tight sound we are typically after on Gospel records. This can be taken of by using gates, but sometimes they take away too much and leave the drums sounding meh. There are some gates designed specifically for drums that do pretty well at minimizing the negative effects of traditional gates.
Slate Digital Gate: Drums
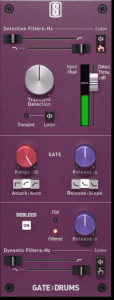
Unlike traditional gates that are based on signal level, the Gate: Drums is based on transient input. If that wasn’t cool enough, this gate also includes a Debleed section that allows you to filter the tail of the signal after the transient.
This special take on this traditional tool really opens up the possibilities of making your drums punch without the extra bleed that is inevitable in recording.
Sonnox Oxford Drum Gate

Similar to the Slate Gate: Drums, the Oxford Drum Gate works based on the transients rather than the signal level. It also features a decay section, which is essentially the same as the Slate’s Debleed section allowing you to fine tune the tail of the sound. Where this plugin differs most is the addition of a Leveller section. This allows you to level out the drum hits, not by using compression (by hand this takes a while).
There other plugins that are not gates and a more advanced algorithms that get into Machine Learning that are pushing technology past just the opening and closing of gates towards attempting to actually remove the bleed from the signal all together; even on simultaneous hits!
Accusonus Drumatom2

Drumatom2 is far from your typical gate plugin. So far that in order to use it you have to export your drum files and import them into the standalone application. (When it comes to audio editing, some of the best tools and algorithms exist in standalone applications. i.e. iZotope RX)
Once the files are imported, you have to analyze them. This analysis looks at the contents of the tracks and attempts to guess what each file is. Hopefully you named them properly on export just to be sure, but the algorithm does an amazing job at determining what they are. You can then proceed to use the simple two knob controls to dial in the perfect debleeding for each close mic. Notice that you can create multiple groups which will give you different results. I will again give you Greg Wurth to give a look a this amazing tool.
Check Out Our Recording Gospel Course Taught by John “Yosh” Jaszcz
3. Editing By Hand…

All of the aforementioned tools are awesome and I use them regularly in my mixes. But they are not guaranteed and sometimes don’t give the results I’m after. In these cases, I resort to the tedious task of manually editing by hand (copying and pasting hits, cutting out stuff that isn’t the hits I’m after (Pro Tools has a clutch tool for this called Strip Silence).
I hope I’ve given you some ideas of things to try to tighten up those drums. No matter how you chose todo it, edit those drums doc! I’ll see you in the next one, where we will get to the fun part; mixing!
 About The Author:
Starting on drums and migrating to piano and saxophone then continuing on to engineering, DeLaVanta has been in the music industry his entire life. He has produced, recorded, edited, and mixed music in many genres specializing in music with live instrumentation. In addition to music, he has worked extensively in the world of Post Production as a Re-recording Mixer for Films, TV Shows, and Documentaries. Most recently working at Tyler Perry Studios as a re-recording mixer on the hit shows The Oval and Sistas. You can see Del’s full body of work and or contact him on his website: https://www.hydrateent.com/


